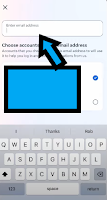
Have you ever needed to update your email on Instagram? Maybe you got a new email address or lost access to your old one. Whatever the reason, keeping your
email up to date is essential to secure your account and
avoid login issues. In this guide, I’ll show you how to change email on
Instagram quickly and easily.
Why Your Email Important on Instagram
Your email is like a safety net for your Instagram account. It’s where you get important notifications, password recovery options, and updates about your
account. If your email is outdated or wrong, you might face
trouble recovering your account or staying updated.
Why Would You Change Your Instagram Email?
- Lost Access to Old Email: Forgot your email password or closed your old account? Time to update!
- Switching to a New Email: Maybe you’ve moved to a better or more secure email provider.
- Boosting Security: Using a secure email specifically for Instagram is a smart move.
How to Change Email on Instagram (Step-by-Step Guide)
Here’s the good news: Changing your email on Instagram is quick and simple.
Step 1: Open the Instagram App
- Launch the Instagram app on your smartphone.
- Make sure you’re logged in to the account you want to update.
Step 2: Navigate to Your Profile
- Tap the profile icon in the bottom-right corner of the app.
- Once you’re on your profile page, tap the three horizontal
lines (menu) in the top-right corner.
Step 3: Go to Account Settings
- From the menu, select Settings and Privacy.
- Next, click on the Account center option.
- Scroll down and tap Personal Details under the “Account” section.
Step 4: Update Your Email Address
- Look for the contact info. Tap on it to edit.
- Next, click on the add new contact button.
- Look for the add email button.
- Enter your new email address, then hit Save.
Step 5: Verify Your Email
- Instagram will send a confirmation email to the new address.
- Open your email inbox and click the verification link in the message from Instagram.
Step 6: Confirm the Change
- Once verified, your new email is officially linked to your Instagram account.
Common Problems (And How to Fix Them)
- Didn’t Get the Confirmation Email? Check your spam or junk folder. Still nothing? Resend it.
- Email Already Used: The email might be linked to another Instagram account. You’ll need a unique email.
- Forgot Your Password? Use the Forgot Password option on the login page to reset it.
Extra Security Tips for Instagram
- Strong Passwords Are Key: Use a mix of letters, numbers, and symbols.
- Enable Two-Factor Authentication (2FA): Add an extra layer of security with a verification code.
- Keep Your Info Updated: Don’t forget to update other account details too.
FAQs About Changing Your Instagram Email
1. Can I Use One Email for Multiple Instagram Accounts?
No, Instagram requires a unique email for each account.
2. What If My Email Gets Hacked?
Change it immediately and enable two-factor authentication.
3. How Often Should I Update My Email?
Only when you switch to a new email or suspect a security issue.
4. Can I Recover My Account Without an Email?
Yes, you can use your phone number or contact Instagram support.
5. Why Am I Not Receiving the Confirmation Email?
Double-check the email address you entered and look in your spam folder.
Conclusion
Changing your email on Instagram is easy, and it’s one of
the best ways to secure your account. Keep your information up to date, verify
your changes, and you’ll never have to worry about losing access to your
profile.
.png)


.jfif)

0 Comments